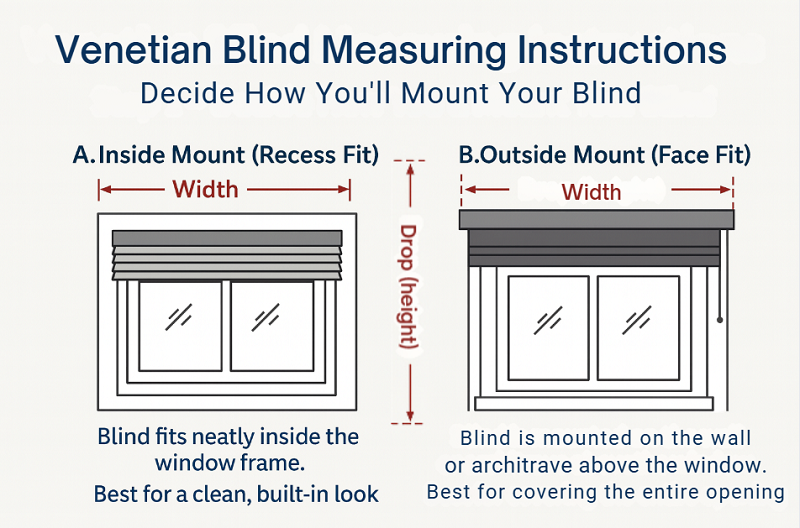
Step 1 – Decide How You’ll Mount Your Blind
You can choose either:
A. Inside Mount (Recess Fit)
Blind fits neatly inside the window frame.
Best for a clean, built-in look.
Ideal when there’s enough frame depth to accommodate the headrail and slats.
B. Outside Mount (Face Fit)
Blind is mounted on the wall or architrave above the window.
Best for covering the entire opening and improving light control.
Step 2 – Measure Your Window
A. Inside Mount (Recess Fit)
Width:
Measure the inside width of the window at top, middle, and bottom.
Record the narrowest width.
Do not make any deductions – our factory will automatically allow for clearance.
Drop (Height):
Measure the inside height at left, centre, and right.
Record the longest height.
Example:
Inside width = 1200 mm → Final blind width made = 1195 mm
Inside drop = 1500 mm → Final blind drop = 1500 mm
Tip: Ensure there are no handles or obstructions inside the frame.
B. Outside Mount (Face Fit)
Width:
Measure the area you wish to cover.
Add at least 50 mm on each side (total +100 mm) for better light block.
Drop (Height):
Measure from the top fixing point (usually above the frame)
to the bottom point (below the sill or floor).
Add at least 50 mm above and below for full coverage.
Example:
Frame size = 1200 mm W × 1500 mm H
→ Order blind = 1300 mm W × 1600 mm H
Tip: For sliding doors or full-length windows, extend beyond the opening for full privacy.
Step 3 – Double Check Before Ordering
Use a metal tape measure.
Measure twice to confirm.
Always state width first, then drop (e.g. 1200 W × 1500 H mm).
Specify whether your size is Inside Mount or Outside Mount.
Step 1 – Check Your Parts
Included with your Venetian Blind:
Blind (with headrail and slats assembled)
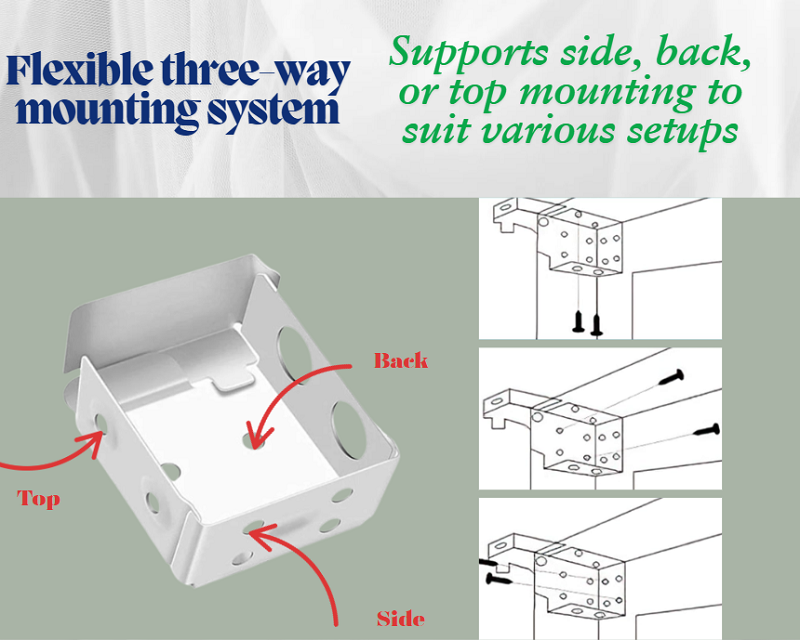
Mounting brackets (2 or more)
Screws and wall plugs
Wand or cord control
Optional: hold-down brackets (for bottom rail)

Step 2 – Choose Mounting Type
Inside Mount: Brackets go inside the frame.
Outside Mount: Brackets go on the wall or architrave above the frame.
Step 3 – Mark Bracket Positions
Hold the blind in place and mark bracket positions with a pencil.
Check brackets are level using a spirit level.
Ensure there’s enough clearance for slat rotation and lift cords.
Step 4 – Fix the Brackets
Drill pilot holes at marked points.
Insert wall plugs if fixing to masonry.
Secure brackets firmly using screws provided.
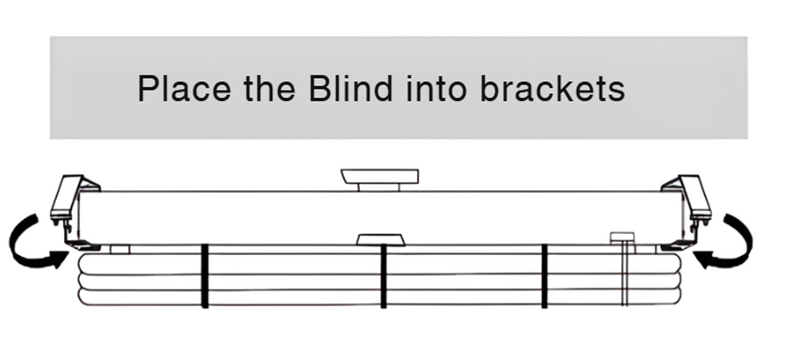
Step 5 – Fit the Blind Headrail
Open the brackets’ swing arms (if applicable).
Insert the headrail into the brackets.
Close the bracket covers securely to lock in place.
Step 6 – Test Operation
Use the tilt wand or cords to open and close the slats.
Raise and lower the blind fully to ensure smooth movement.
Adjust the cord tension if the lift feels uneven.
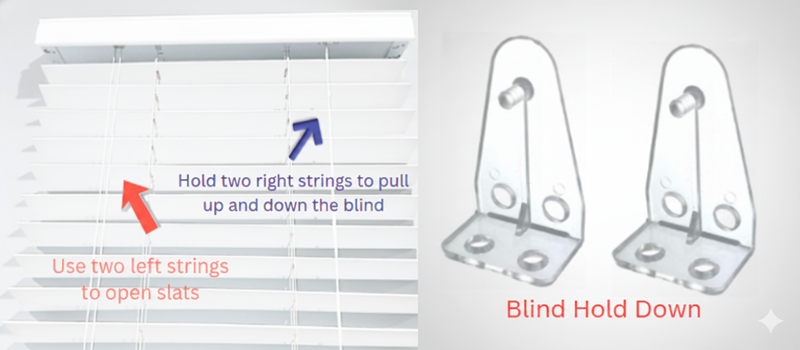
Step 7 – Optional: Install Hold-Down Brackets
For doors or windy areas, attach hold-down brackets to the bottom rail to keep the blind steady.
Step 8 – Final Check
Blind is level and operates smoothly.
All screws are tight and secure.
Clean with a soft damp cloth — do not use chemicals.