Before placing your order, please read carefully to ensure a perfect fit.
All measurements should be provided in millimetres (mm) for accuracy.
There are two options:
Inside Mount (Recess Fit) – Blind fits inside the window frame.
Ideal for a neat, built-in look.
Outside Mount (Face Fit) – Blind covers the entire window frame.
Ideal for better light control or to hide an uneven frame.
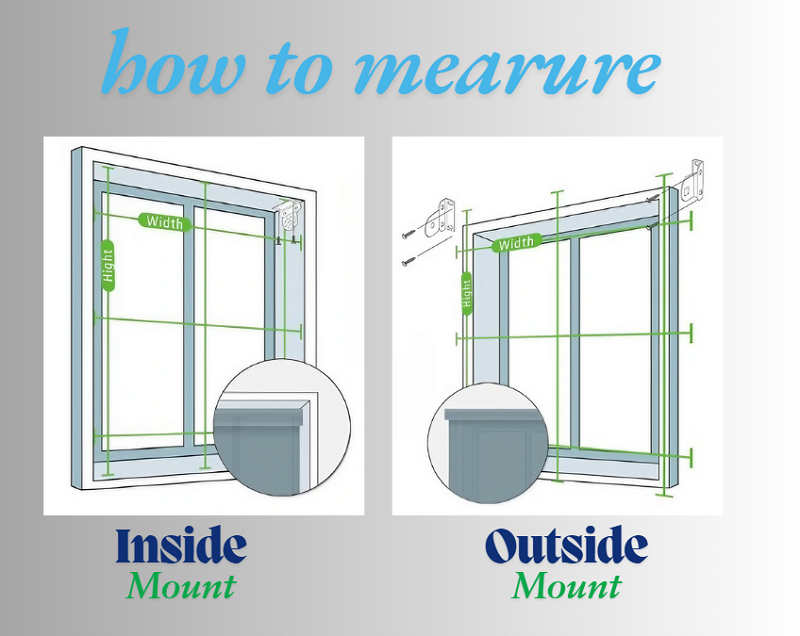
Width:
Measure the inside width of the window at top, middle, and bottom.
Record the narrowest width.
Do not make any deduction — our factory will automatically deduct a small amount (usually 3–5 mm) to ensure a perfect fit.
Drop (Height):
Measure the inside height of the window at left, centre, and right.
Record the longest height.
Example:
Inside width = 1200 mm → we’ll make the blind about 1195 mm wide.
Inside drop = 1500 mm → blind drop = 1500 mm.
Tip: Make sure there are no window handles or obstacles blocking the blind.
Width:
Measure the area you want to cover.
Add at least 50 mm on each side (total +100 mm) for better light coverage.
Drop (Height):
Measure from where you want the top of the blind to start (usually above the frame)
to where you want it to finish (usually below the sill or floor).
Add at least 50 mm above and below for full coverage.
Example:
Window frame = 1200 mm wide × 1500 mm high
→ Order blind width = 1300 mm, blind drop = 1600 mm.
Tip: For sliding doors or full-length windows, extend the blind past the opening for best light block.
Choose:
Left Side or Right Side for chain control
(decide based on convenience and window layout).
Use a metal tape measure (not a fabric one).
Measure twice to confirm.
Always give width first, then drop (e.g. 1200 mm W × 1500 mm H).
Specify whether your measurements are “Inside Mount” or “Outside Mount.”
For dual blinds (sunscreen + blockout), ensure enough depth inside the frame.
For motorised blinds, check clearance for battery or motor head.
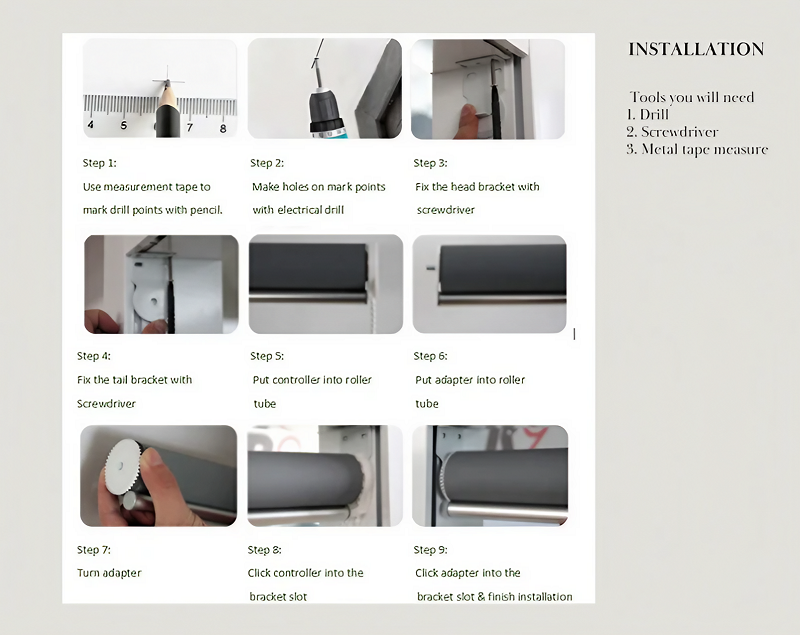
Before you start:
Ensure you have the correct blind size and all parts included.
Use a metal tape measure and a cordless drill or screwdriver for best results.
Your package should include:
Roller blind (pre-assembled)
Mounting brackets (2 or more depending on width)
Screws and plugs
Optional: child safety chain tensioner
Lay everything out before beginning.
Inside Mount (Recess Fit):
Brackets sit inside the window frame for a neat, built-in look.
Outside Mount (Face Fit):
Brackets are fixed to the wall or architrave above the window, covering the full frame.
For Inside Mount:
Hold the blind inside the recess where it will sit.
Mark where the brackets will be fixed at each end (and in the centre if needed).
Ensure the blind clears any window handles or obstructions.
For Outside Mount:
Hold the blind above the window frame where you want it installed.
Mark bracket positions so the fabric covers the window completely.
Check the blind is level using a spirit level.
Drill pilot holes at the marked spots.
Fix the brackets securely using the screws provided.
Make sure brackets are aligned horizontally and firmly attached.
(For masonry walls, use wall plugs before inserting screws.)
Insert the pin end of the blind into the bracket first.
Then push the control end (chain side) into the opposite bracket until it clicks.
Test by pulling the chain to ensure smooth operation and proper rolling direction.
Position the chain tensioner so the chain runs through it smoothly.
Fix it securely to the wall with the screw provided.
This prevents loose hanging chains for child safety compliance.
Pull the blind up and down several times to ensure it rolls smoothly.
Confirm it’s level and evenly tensioned.
Clean with a soft cloth — your blind is ready to use!
Cordless drill or screwdriver
Level
Pencil
Tape measure
Step ladder